This article describes how to install the Trac bug tracking system using the Python Selector in cPanel.
To install Trac on account, you need to follow these steps:
Step # 1: Log in to in cPanel.
Step #2 : In the Software section of the cPanel home screen, click Setup Python App.
Step # 3: Under Setup new application, create a new application:
- In the Python version list box, select 2.7.
- In the App Directory text box, type a directory name for the application (for example, trac).
- In the App Domain/URI list box, select the domain, and then type the URL for the application (for example, example.com/trac).
- Click Setup cPanel creates the application.
Step #4: To add the required modules, connect to your account using SSH, and then type the following commands. Replace username with your own XeonBD account username:
source /home/username/virtualenv/trac/2.7/bin/activate
pip install genshi mysql-python trac
Step #5: In cPanel, create a MySQL database and database user.
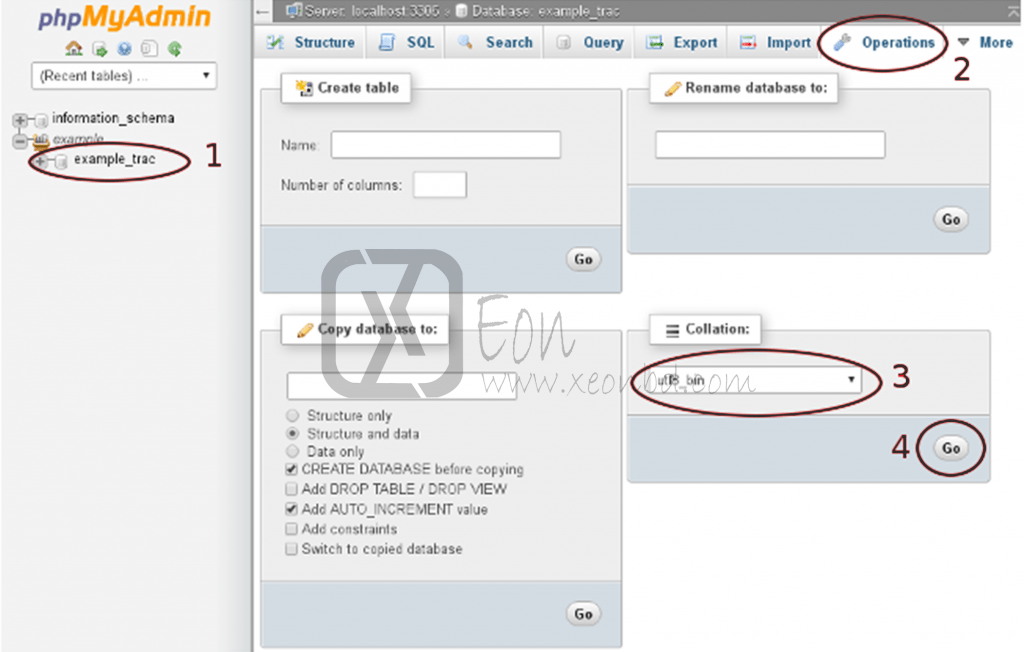
Step # 6: In cPanel, change the collation for the database:
- In the DATABASES section of the cPanel home screen, click phpMyAdmin.
- In the left sidebar, click the database you created in step 5.
- Click the Operations tab.
- Under Collation, select utf8_bin, and then click :

Step #7 : At the command prompt, type the following command:
~/virtualenv/trac/2.7/bin/trac-admin ~/trac_project initenv
At the Database connection string prompt type the following string. Replace database_user, database_user_password, and database_name with the values you used in step 5:
mysql://database_user:database_user_password@localhost/database_name
When Python successfully creates the project environment, you receive a Congratulations! message.
Step # 8: To create the project’s web front-end, type the following commands:
~/virtualenv/trac/2.7/bin/trac-admin ~/trac_project deploy ~/trac
cd ~/public_html/trac
mkdir chrome
cp -R ~/trac/htdocs/ ~/public_html/trac/chrome/
Step # 9: To configure the WSGI (Web Server Gateway Interface) for the application:
- In the SOFTWARE section of the cPanel home screen, click Setup Python App.
- Locate the application you created in step 3, and then next to WSGI file location, click Edit.
- In the text box, type cgi-bin/trac.wsgi and then click Save.
- Click Update, and then click Restart.
Your application configuration settings should resemble the following:

Step # 10: To configure authentication for the project:
- In cPanel, use the Directory Privacy feature to configure a username and password for the ~/public_html/trac directory. The username should be admin, and the password can be whatever you want.
- At the command prompt, type the following command:
~/virtualenv/trac/2.7/bin/trac-admin ~/trac_project permission add admin TRAC_ADMIN
Step # 10: Use your web browser to go to example.com/trac, where example.com represents your domain name. After you authenticate as the admin user, you should see the Trac home page.


